15000+ live websites are using this google maps wordpress plugin.

Archives: Docs

Display Unlimited Filters for BuddyPress Members on Google Maps

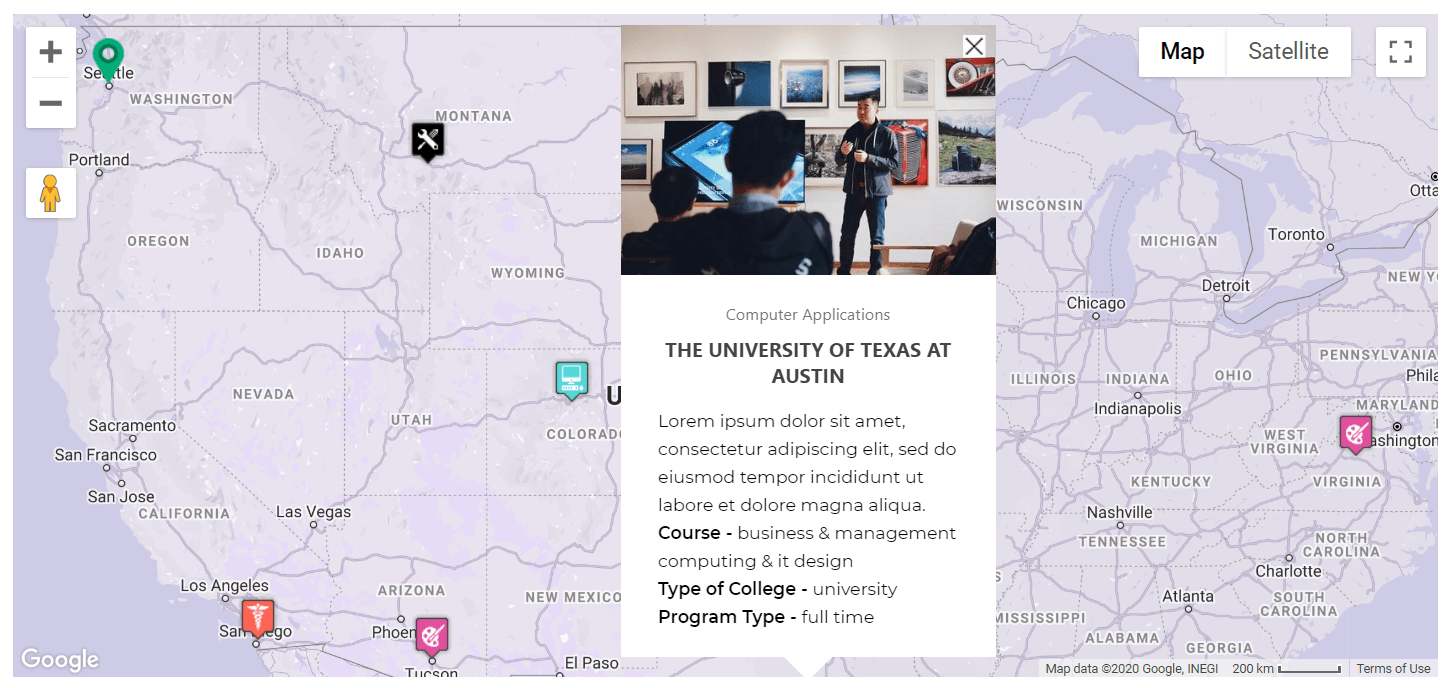
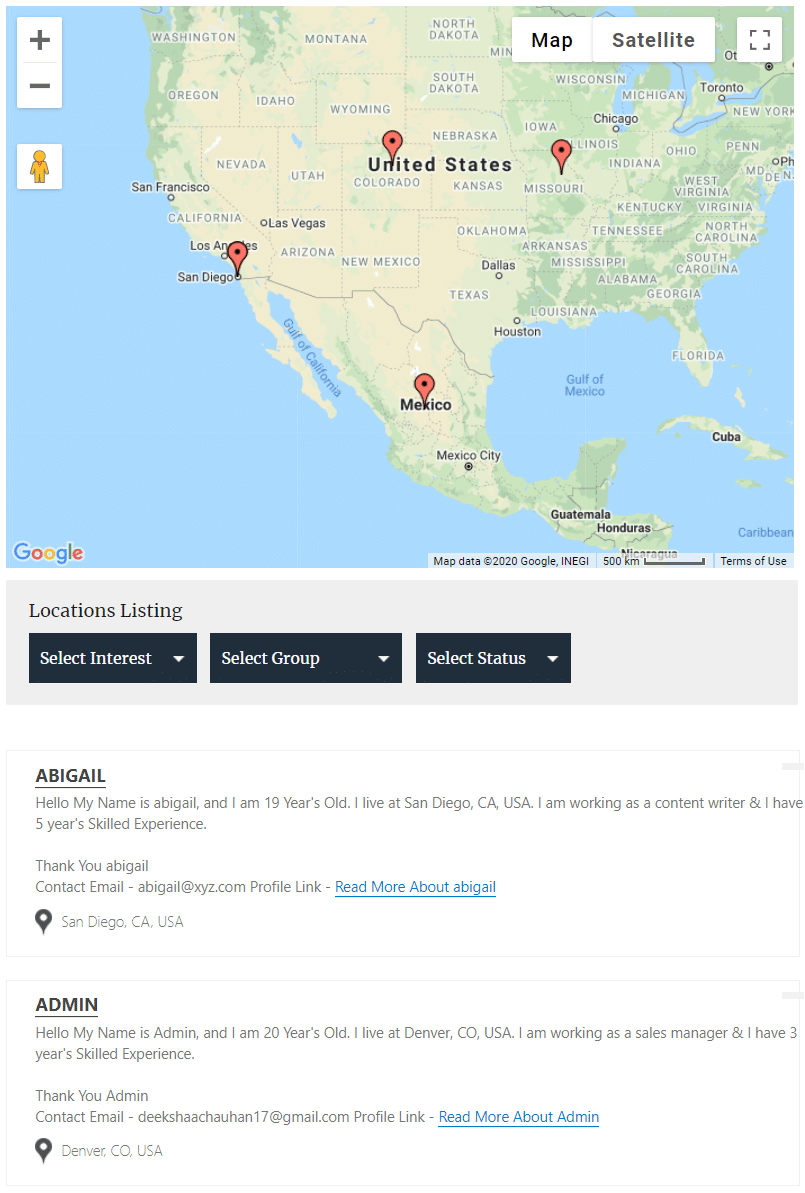
The BuddyPress Members on Google Maps extension for WP MAPS PRO lets you display registered BuddyPress members directly on Google Maps — complete with member details in both the info window and listing view.

Using this extension, you can filter members by user roles, BuddyPress groups, or even create unlimited custom filters based on profile fields or placeholders. This makes it easy to create advanced map search tools for your community.

Requirements:
Before starting, make sure you have installed and activated:
1. WP MAPS PRO Plugin
2. BuddyPress Members on Google Maps Extension


How to Display Unlimited BuddyPress Filters on Google Maps

Step 1: Enable BuddyPress Members Display

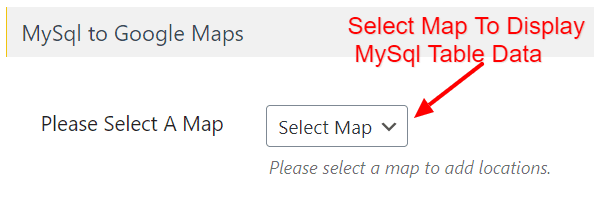
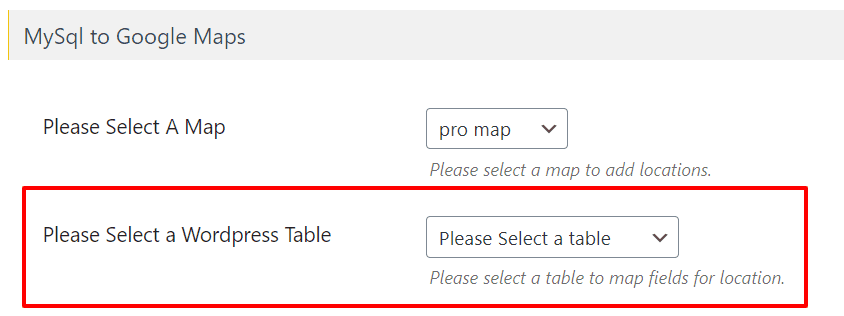
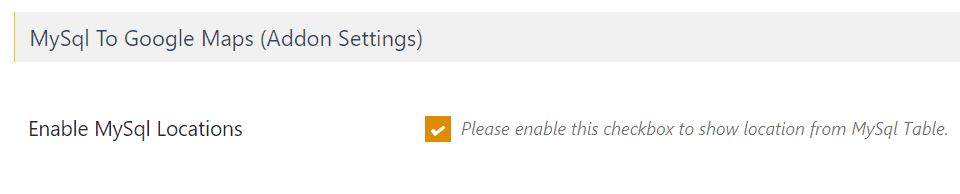
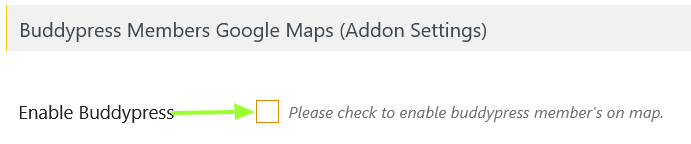
Navigate to Add or Edit Map and scroll to the “BuddyPress Members Google Maps (Addon Settings)” section.

Enable “Enable Buddypress” and save your settings.

Enable BuddyPress Members on Google Maps

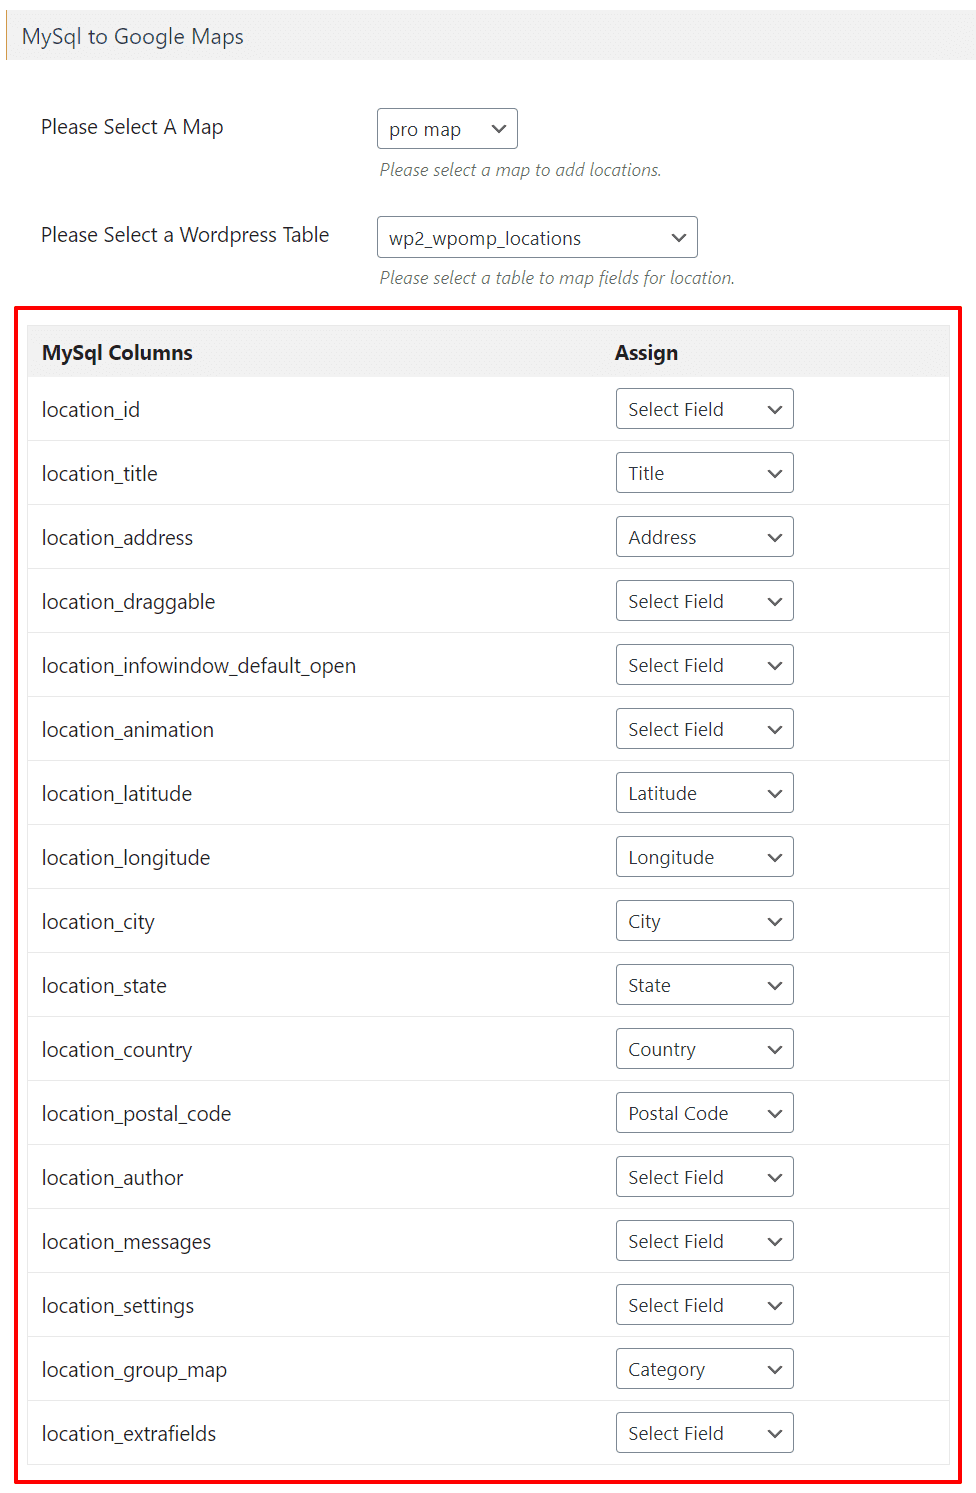
Step 2: Copy BuddyPress Profile Field Names

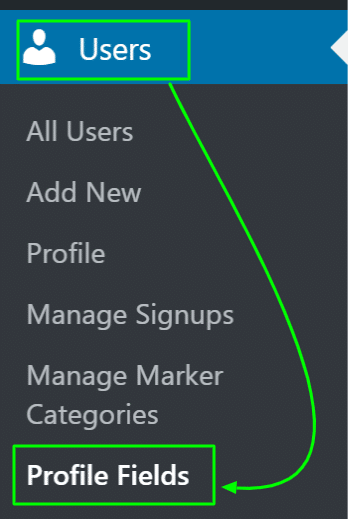
Go to Users → Profile Fields in your WordPress admin panel.

Navigate to BuddyPress Profile Fields

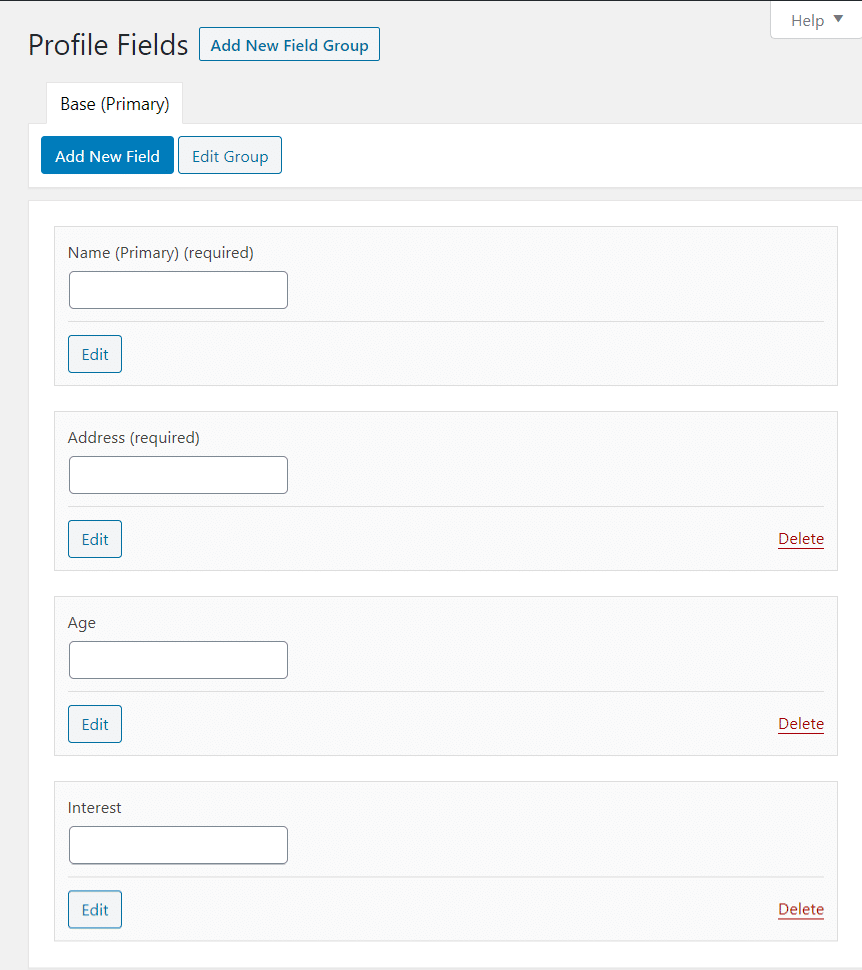
Here you’ll see all your created profile fields. Copy the field name(s) you want to use for filtering.

BuddyPress Profile Fields

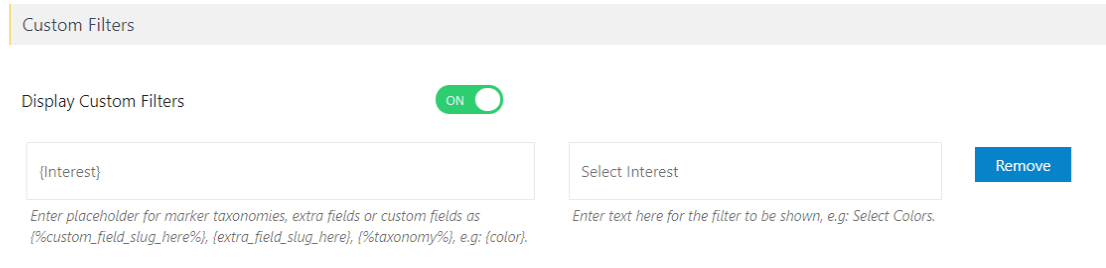
Step 3: Add Custom Filters

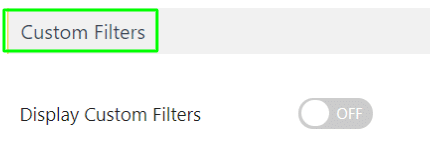
Go back to Add / Edit Map and scroll to the “Custom Filters” section. Enable the “Display Custom Filters” option.

Enable Custom Filters

Paste the copied field name into the filter field box.

Add Custom Filter from BuddyPress Field

Step 4: Use Placeholders (Optional)

You can also create filters using placeholders provided in the addon settings.

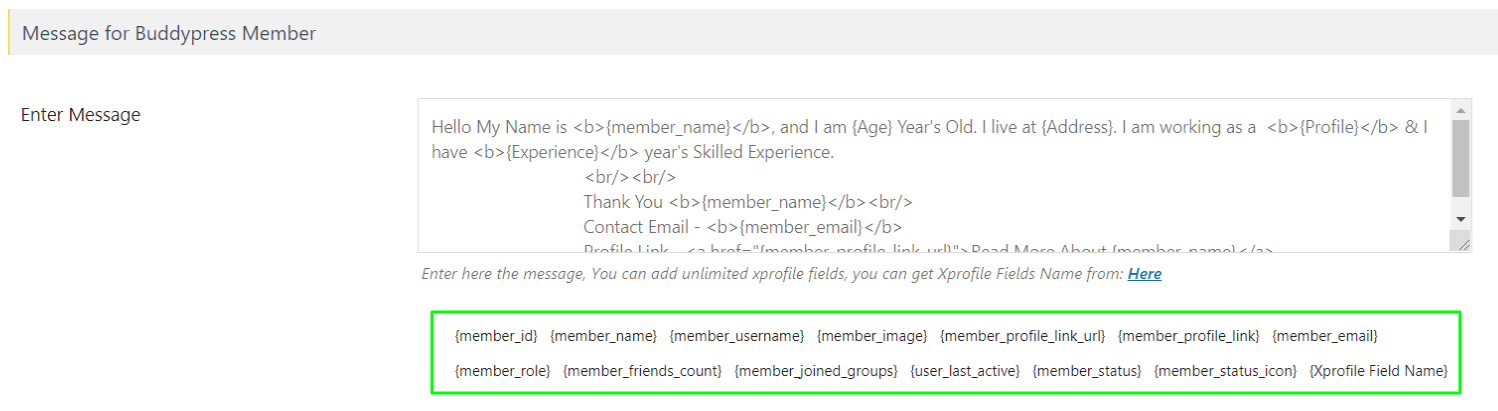
In the “Message for BuddyPress Member” section, click on “Show Placeholders”.

Show BuddyPress Placeholders

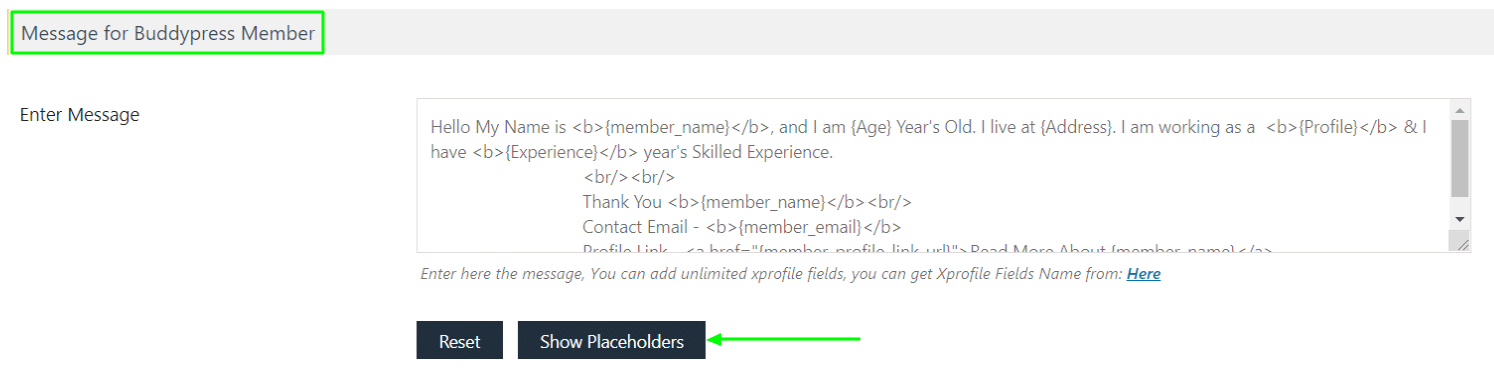
Copy the placeholder you need and paste it into the “Custom Filters” field box.

Copy Placeholder
Paste Placeholder in Filter

Step 5: Save and View

Click the ‘Save’ button. On the frontend, you’ll now see your custom filters displayed above the map.

BuddyPress Filters on Map


Live Demo

To see this feature in action, click here.

Need Help?

If you have any questions or need assistance, please contact our support team.

The Frontend Submissions on Google Maps extension for WP MAPS PRO allows members or guests to submit new map locations (markers) directly from the frontend of your website. Users can enter their address details, and all submitted locations can be displayed on the map as well as in a submission listing table.

This is perfect for community-driven maps, event submissions, store locators, and more.

Requirements: Before starting, ensure you have installed and activated:
1. WP MAPS PRO Plugin
2. Frontend Submissions on Google Maps Add-on

If WP MAPS PRO is not yet installed, follow this guide to install and configure it.


1) Display the Frontend Submission Form

Use the shortcode

Please upload a location image file.
to display the submission form on any page, post, widget, or custom post type.

Step 1: Paste the shortcode where you want the form to appear.

Step 2: Save the page and view it — the form will display like this:

Frontend Submission Form


2) Manage the Frontend Submission Form

Step 1: Go to WP MAPS PRO → Frontend Form Submission.

Frontend Form Submission Menu

Step 2: Open the “Choose Fields in Add Location Form” tab.

Step 3: Enable the checkboxes under “Display On Form” for the fields you want to show.

Step 4: Mark any required fields by checking “Mandatory?”.

Select Fields for Frontend Form

Step 5: Save your changes — the selected fields will now appear on the frontend form.

Frontend Form Fields


3) Add Extra Data Fields to the Form

You can include additional information fields if you’ve already created extra fields in WP MAPS PRO.

If you haven’t created extra fields yet, see this guide.

Once extra fields are created, follow the steps in section 2) Manage Frontend Submission Form to enable them.

Extra Fields in Frontend Form


4) Display Selected Categories on the Frontend Form

You can limit the category dropdown to specific categories.

If you haven’t created categories yet, follow this guide.

Step 1: Go to the “Select Category to Display on Frontend Form” tab.

Step 2: Choose categories from the dropdown and save.

Select Categories for Frontend Form


5) Display Submitted Locations in a Listing Table

Use the shortcode [fngmp_location_listing] to display a table of all locations submitted by the logged-in user.

Example demo: Click here.

Frontend Submission Listing Table


6) Display Selected Extra Fields in the Listing Table

Step 1: Go to the “Display Extra Fields On Table” tab.

Step 2: Select the extra fields you want to show in the listing table.

Step 3: Save your settings — now only selected fields will appear in the table.

Extra Fields in Listing Table


7) Display Import Location Form on the Frontend

Use the shortcode [fngmp_import_location] to display an import form where users can upload multiple locations from the frontend.


8) Manage Add-on Settings

From the Frontend Form Submissions settings page, you can:

  • Control who can submit locations
  • Control who can view submitted locations
  • Control who can import locations
  • Require users to log in before accessing submission or listing forms
  • Add a custom message for non-logged-in users

Need Help?

If you have any questions or need assistance, please contact our support team.

The Customer Itinerary add-on for WP MAPS PRO lets your members or guests create, manage, and display their own trip routes on Google Maps. They can submit trip locations from the frontend, group them into trips, and view the routes directly on a map.

Requirements: Before starting, make sure you have installed and activated:
1. WP MAPS PRO Plugin
2. Customer Itinerary Add-on

If WP MAPS PRO is not yet installed, follow this guide to install and configure it.


1) Create a Map for the Trip Route

Step 1: Go to WP MAPS PRO → Add Map and create a new map for displaying the trip route.


2) Understand the New Post Types

Step 2: After activating the add-on, you will see two new post types:

  • Trip Locations – for creating individual locations
  • My Trip – for grouping locations into a trip

Go to Trip Locations to start creating your locations.

Trip Locations Post Type


3) Add Trip Locations

Step 3: Click Add New Location, enter a title (location name), and use the WP MAPS PRO Metabox to:

  • Enter an autosuggest address
  • Select the map you created earlier

Add Trip Location


4) Assign Locations to a Trip

Step 4: On each location’s page, you will see two buttons:

  1. Create New Trip – create a trip and assign this location to it.
  2. Add to Existing Trip – select a trip from the dropdown to add this location.

Create New Trip
Add to Existing Trip


5) Configure Add-on Settings

Step 5: Go to WP MAPS PRO → Customer Itinerary on Google Maps.

Step 6: Select your map from the Select Map dropdown.

Step 7: Click Save Setting.

Customer Itinerary Settings


6) Display Trip List on the Frontend

Step 8: Use the shortcode [user_trips_list] to display a trip list form where users can create and manage trips.

Trip List Form


7) Create a New Trip

Step 9: Click Create New Trip.

Step 10: Enter a trip name and click Create Trip. The trip will appear in the table below, ready for location assignments.

Create Trip Form


8) Assign Locations to a Trip

Step 11: Click Edit on the trip you want to add locations to.

Step 12: Click Add More, select your locations, and click Update Trip.

Update Trip


9) View the Trip Route

Step 13: Go to the trip page and click View to see your route on the map. All selected locations will be connected in a trip route view.

View Trip Route
Trip Route on Map


Need Help?

If you have any questions or need assistance, please contact our support team.

How to Update WP Maps Pro Plugin (WePlugins & CodeCanyon)

Keeping WP Maps Pro updated ensures access to new features, bug fixes, and compatibility improvements. Depending on where you purchased the plugin, there are two methods to update it — either via CodeCanyon or WePlugins. Choose your update method below:


✅ Method 1: Update via WePlugins Dashboard (Recommended)

If you purchased the plugin from weplugins.com, updates are delivered through the WePlugins Core Plugin.

  1. Ensure the WePlugins Core Plugin is installed and activated.
  2. Navigate to Dashboard Page and click on Get Updates button.

    Get Updates from WePlugins

  3. If an update is available, you’ll see the new version and Last updated date next to WP Maps Pro.

    Update WP Maps Pro using WePlugins

  4. Click Download Now — the plugin will automatically update without data loss.

💡 Tip: WePlugins users do not need any API key or token to receive updates — it’s all handled securely via the Core Plugin.


✅ Method 2: Update via CodeCanyon.net

🔁 Option A: Manual Update

  1. Log in to codecanyon.net/downloads.
  2. Download the latest version of WP Maps Pro (Installable WordPress ZIP).

    Install WP Maps Pro from Codecanyon.net

  3. In your WordPress dashboard, go to Plugins → Add New → Upload Plugin.
  4. Upload the ZIP file and click Install Now.
  5. WordPress will automatically replace the old version — your settings and data will remain safe.

🔁 Option B: Automated Update via Envato Market Plugin

  1. Download and install the Envato Market Plugin.
  2. Generate an API token at build.envato.com.
  3. Go to Envato Market → Settings in your dashboard and paste the token.
  4. Once connected, you’ll see your purchased plugins, including WP Maps Pro.
  5. Click Update next to the plugin when a new version is available.

📌 Conclusion

No matter where you purchased WP Maps Pro, keeping it updated is easy and secure. We recommend using the WePlugins Core Dashboard if you’re a WePlugins customer for seamless updates.

Need help during the update process? Submit a support ticket — we’ve got your back!

The Search Widget for Google Maps add-on for WP MAPS PRO allows you to add a customizable search form anywhere on your website. Visitors can search for locations and get redirected to a map page showing matching results.

Using the shortcode [google_search_form map_url="your_map_page_url"], you can easily connect a search form to a specific map page. You can also customize the form title, placeholder text, and button label via shortcode parameters.


Requirements

Before setting up the search widget, make sure you have:

  1. Installed and activated the WP MAPS PRO plugin
  2. Installed and activated the Search Widget for Google Maps add-on

If WP MAPS PRO is not installed, follow this installation guide first.


Step-by-Step Setup

Step 1 – Enable URL Filters

Go to your desired map’s settings (Add / Edit Map) and scroll down to Advanced Settings. Enable the URL Filters option — this is required for the search form to work.

Filter Google Maps by URL Parameters

Step 2 – Configure Search Widget Settings

Go to WP MAPS PRO → Search Widget Settings. Enter your default form details and save the settings.

Search Widget Settings

Step 3 – Add the Search Form Shortcode

Place the shortcode on any page, post, or widget area:

[google_search_form map_url="https://www.wpmapspro.com/example/restaurants-listing/"]

Note: The map_url parameter is required and must be the URL of your map page.

Search Form Example


Optional Customization Parameters

You can override the default settings for each search form using shortcode parameters:

1. Custom Form Title

[google_search_form map_url="https://www.wpmapspro.com/example/restaurants-listing/" title="Find Nearby Restaurant"]

Custom Search Title

2. Custom Placeholder Text

[google_search_form map_url="https://www.wpmapspro.com/example/restaurants-listing/" placeholder="Enter restaurant name / cuisine name / dish name"]

Custom Placeholder

3. Custom Button Text

[google_search_form map_url="https://www.wpmapspro.com/example/restaurants-listing/" button_text="Search Restaurants"]

Custom Button Text

To view a live example of the search widget in action, click here.


Need Help?

If you have any questions or need assistance, please contact our support team.

With the WP MAPS PRO plugin and the JSON to Maps add-on, you can easily display data from a JSON file on Google Maps. Simply upload your JSON file in the backend, map the JSON fields to your map’s title, content, and images, and the plugin will automatically display the data in both the info window and listing.


Requirements

Before getting started, make sure you have:

  1. Installed and activated the WP MAPS PRO plugin
  2. Installed and activated the JSON to Maps add-on

If WP MAPS PRO is not installed, follow this installation guide first.


Step-by-Step Setup

Step 1 – Access the JSON File to Map Page

Go to WP MAPS PRO → JSON File to Map.

Step 2 – Select Your Map

From the Select Map dropdown, choose the map where you want the JSON data to appear.

Select Map for JSON Data

Step 3 – Upload JSON File

After selecting the map, a Choose JSON File dropdown will appear. Upload your JSON file here.

Upload JSON File

Step 4 – Map JSON Fields to Location Data

Once uploaded, the JSON file’s columns will appear with dropdowns. Assign each column to the correct location field (e.g., Title, Latitude, Longitude).

Map JSON Fields

Note: Title, Latitude, and Longitude are required. You can also map Extra Fields and Categories for additional data.

Step 5 – Save Settings

After mapping, click Save Settings.

Step 6 – Enable JSON Locations on Your Map

Edit your selected map and scroll to the JSON To Google Maps (Addon Settings) section.

Enable the Enable MySql Locations checkbox.

Enable JSON Locations

Step 7 – Save the Map

Click Save Map. Your JSON data will now be displayed on the selected map.

JSON Data Displayed on Map


Live Demo

View a working example here: JSON to Google Maps Demo

Need Help?

If you have any questions, please contact our support team.

With the Excel to WP Maps add-on for WP MAPS PRO, you can easily display location data from an Excel spreadsheet on Google Maps. Simply upload your Excel file in the backend, map the spreadsheet columns to map fields like title, content, and images, and display them in the info window and listing.


Requirements

Before starting, make sure you have:

  1. Installed and activated the WP MAPS PRO plugin
  2. Installed and activated the Excel to WP Maps add-on

If WP MAPS PRO is not installed, follow this installation guide first.


Step-by-Step Setup

Step 1 – Access the Excel File to Map Page

Go to WP MAPS PRO → Excel File to Map.

Step 2 – Select Your Map

From the Select Map dropdown, choose the map where you want the Excel data to appear.

Select Map for Excel Data

Step 3 – Upload Excel File

After selecting the map, a Choose Excel File option will appear. Upload your Excel file here.

Upload Excel File

Step 4 – Map Excel Columns to Location Fields

Once uploaded, the Excel columns will appear with dropdown menus. Assign each column to the correct location field (e.g., Title, Latitude, Longitude).

Map Excel Columns

Note: Title, Latitude, and Longitude are required. You can also map Extra Fields and Categories for more detailed data.

Step 5 – Save Settings

After mapping, click Save Settings.

Step 6 – Enable Excel Locations on Your Map

Edit your selected map and scroll to the Excel to Google Maps (Addon Settings) section. Enable the Enable MySql Locations checkbox.

Enable MySQL Locations

Step 7 – Save the Map

Click Save Map. Your Excel data will now be displayed on the selected map.

Excel Data Displayed on Map


Live Demo

View a working example here: Excel to Google Maps Demo

Need Help?

If you have any questions, please contact our support team.

With the WP MAPS PRO plugin and its MySQL Data on Maps add-on, you can connect any custom MySQL table to Google Maps. This lets you display database records as map markers, with the flexibility to decide which columns appear as title, content, or images in the info window and listing.


Requirements

Before setting up, make sure you have:

  1. Installed and activated the WP MAPS PRO plugin
  2. Installed and activated the MySQL Data on Maps add-on

If WP MAPS PRO is not installed yet, follow this installation guide first.


Step-by-Step Setup

Step 1 – Access MySQL Table to Map

Go to WP MAPS PRO → MySQL Table to Map.

Step 2 – Select Your Map

From the Select Map dropdown, choose the map where you want the MySQL data displayed.

Select Map for MySQL Data

Step 3 – Choose a Database Table

After selecting a map, a Please Select a WordPress Table dropdown will appear. Pick the table containing your data.

Select Database Table

Step 4 – Map Table Columns

All table columns will appear with dropdowns. Assign columns to their respective map fields (e.g., Title, Latitude, Longitude).

Map Database Columns to Google Maps

Note: Title, Latitude, and Longitude are required. Extra fields and categories can also be mapped.

Step 5 – Save Settings

After mapping, click Save Settings.

Step 6 – Enable MySQL Locations

Edit your selected map and scroll down to the MySQL to Google Maps (Addon Settings) section. Enable the Enable MySQL Locations checkbox and save.

Enable MySQL Locations in WP MAPS PRO

Step 7 – Save Your Map

Click Save Map. Your custom MySQL table data will now display as markers on Google Maps.

MySQL Data Displayed on Google Maps


Live Demo

See a working example here: MySQL Data on Google Maps Demo.

Need Help?

If you face any issues, our support team is happy to help.

With the WP MAPS PRO plugin and its Airtable Data to Maps add-on, you can seamlessly connect Airtable spreadsheets to Google Maps. This allows site admins to map Airtable records into Google Maps markers and listings, showing columns such as title, content, and images with complete flexibility.


Requirements

Before you begin, make sure you have:

  1. Installed and activated the WP MAPS PRO plugin
  2. Installed and activated the Airtable Data to Maps add-on

If WP MAPS PRO is not installed yet, follow this installation guide first.


Generate Airtable Base ID and Personal Access Token

To connect Airtable with WP MAPS PRO, you need a Base ID and a Personal Access Token.

Airtable Personal Access Token

Step 1: Log in to your Airtable account, then visit the Create Token page.
Step 2: Click Create New Token, give it a unique name, and select these scopes:

  • data.records:read
  • data.records:write

Step 3: Choose the correct base/workspace, save changes, and copy your Personal Access Token.
Create Airtable Token

Airtable Base ID

Step 1: Visit the Airtable API page.
Step 2: Select the base you want to display, and copy its Base ID from the page.
Get Airtable Base ID

Connect Airtable with WP MAPS PRO

Step 1: Navigate to WP MAPS PRO → Configure Airtable.
Step 2: Insert your Base ID and Personal Access Token into the Configure Airtable Details section, then click Save Settings.
Configure Airtable with WP Maps Pro


Display Airtable Data on Google Maps

Step 1: Go to WP MAPS PRO → Add Map and create a new map.
Step 2: Scroll down to the Airtable to Map (Add-On Settings) section. Enter your Airtable Table Name.
Add Airtable Table to Map

Step 3: Map your Airtable columns to Google Maps fields (Title, Content, Image, etc.) in the provided dropdowns.
Map Airtable Columns to Google Maps

Step 4: Click Save Map. Your Airtable data will now display as Google Maps markers with info windows and listings.


Live Demo

👉 See it in action: Airtable Data on Google Maps Demo

Need Help?

If you face any issues, please reach out to our support team.

With the WP MAPS PRO plugin and its Location Bookmark add-on, your site visitors can easily save their favorite locations directly on a map. This feature displays a bookmark icon in either the info window or the location listing, giving users a personalized experience.

To use this feature, insert the {is_favorite} placeholder into your location templates. The icon will dynamically appear, allowing users to bookmark or unbookmark places with a single click.


Steps to Enable Location Bookmarking

Step 1: Go to Add / Edit Map and scroll down to the “Infowindow Message for Locations” section. Insert the {is_favorite} placeholder inside your chosen info window template.
Add Bookmark to Info Window

Step 2: Navigate to the “Location Listing” section and insert the {is_favorite} placeholder into your selected listing template.
Add Bookmark to Listing

Step 3: After inserting the placeholders, click the Save Map button.
Bookmarks on Google Maps

That’s it! Now your visitors can bookmark their favorite locations on your Google Maps.


Live Demo

👉 Check it out in action: Bookmark Locations Demo


Need Help?

If you run into issues, reach out to our support team.

Install Plugin Now!

WP MAPS PRO helps you create dynamic, customizable maps using Google Maps or Leaflet — no coding required. Includes free updates, premium support, and a 30-day money-back guarantee.