
The very first step in displaying a google maps on any website is to create a google maps api key.
Below is a step-by-step guide that will help you in creating the right google maps api key for your website. Google Maps requires the usage of an API key in order to work properly, as stated by the company’s new regulations in June 2016.
Here is a step-by-step YouTube guide along with a written tutorial for generating a google api for Google Maps.
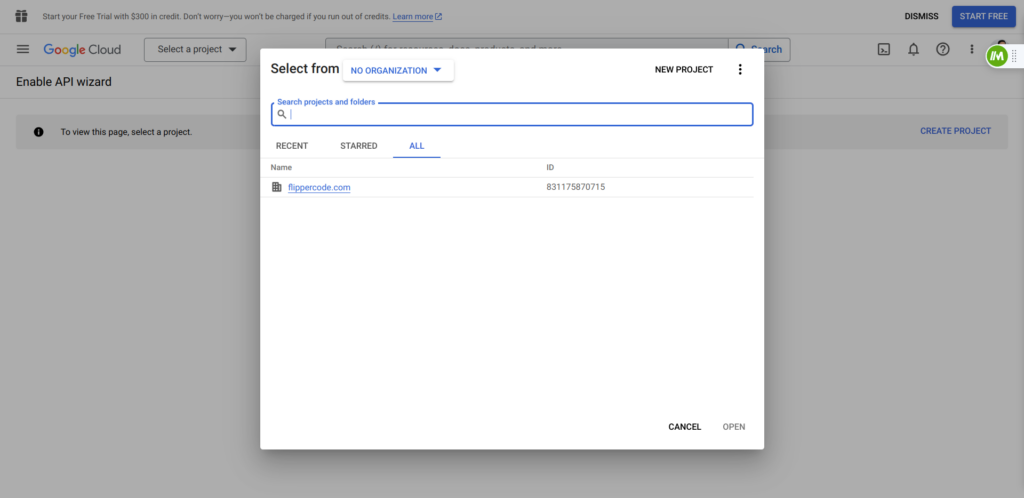
Step 1: Log in to the Google Cloud Platform
-
- Go to the Google Cloud Platform Console.
- If you don’t have a Google Cloud account, you’ll need to create one. Otherwise, log in using your existing account.
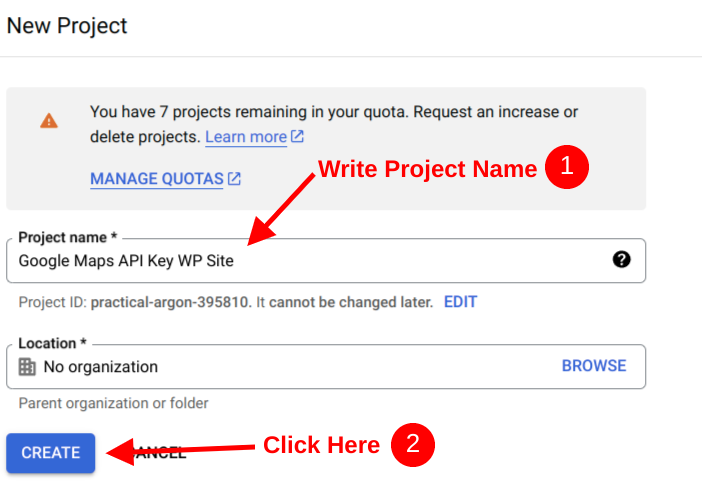
Step 2: Create a New Project
- If you haven’t already created a project for your website, click the project dropdown in the top navigation bar and select “New Project.”
- Give your project a name, choose the organization (if applicable), and click “Create.”
- Once a project is created, you’ll be redirected to the project dashboard.
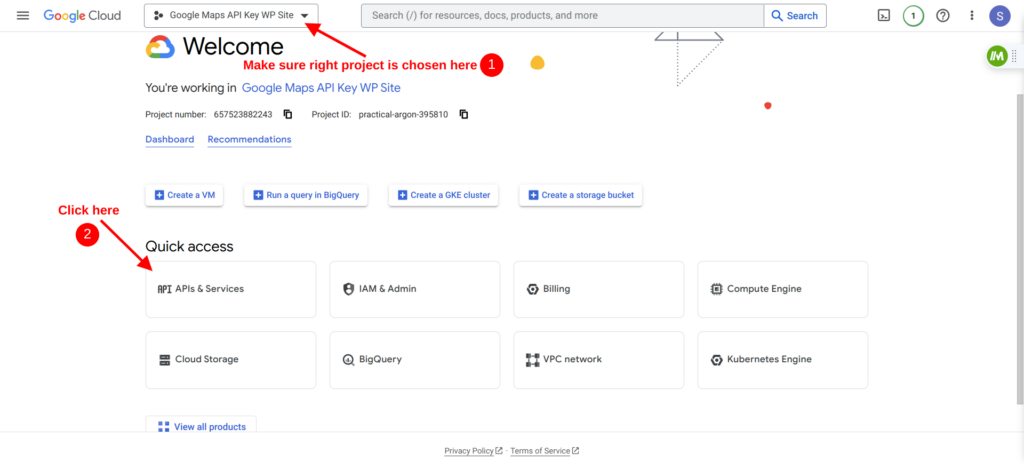
- Once you’re in your project dashboard, click on the “APIs & Services”.
Step 3: Enable Google APIs for Google Maps Services
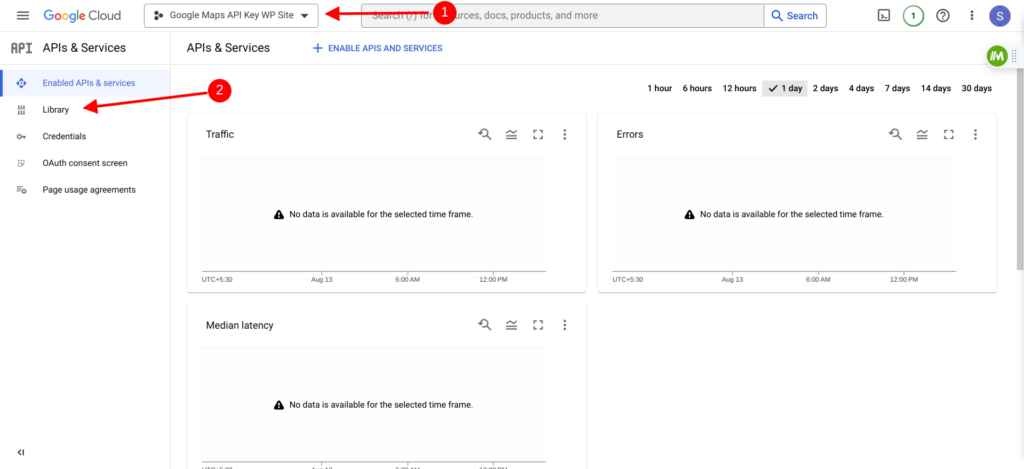
The ‘APIs & Services’ page provides detailed traffic information for each enabled API. It’s a valuable resource for monitoring which APIs are active and understanding how each API is being utilized. In the following step, please enable the following four APIs for utilizing the most of the google maps functionalities.: Maps JavaScript API, Places API, Geocoding API, and Directions API.
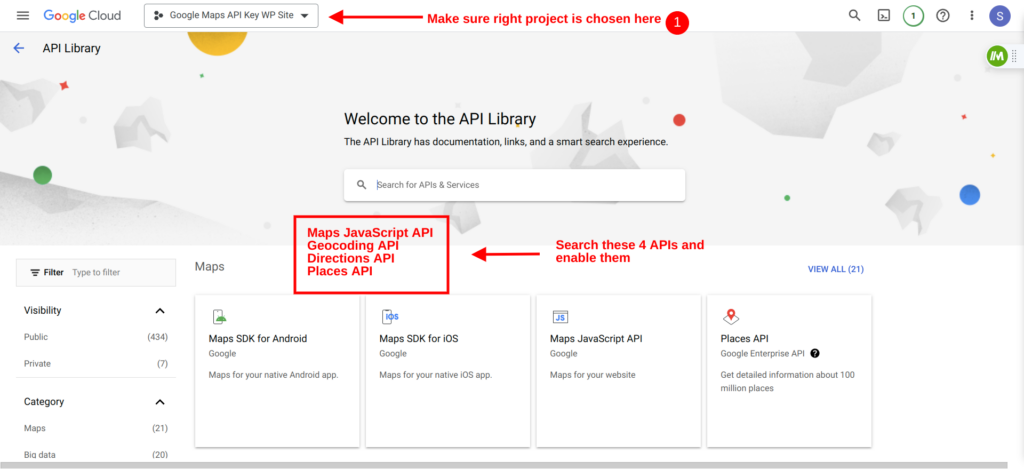
- Click on the “APIs & Services” > “Library” to search for required APIs and enable them.
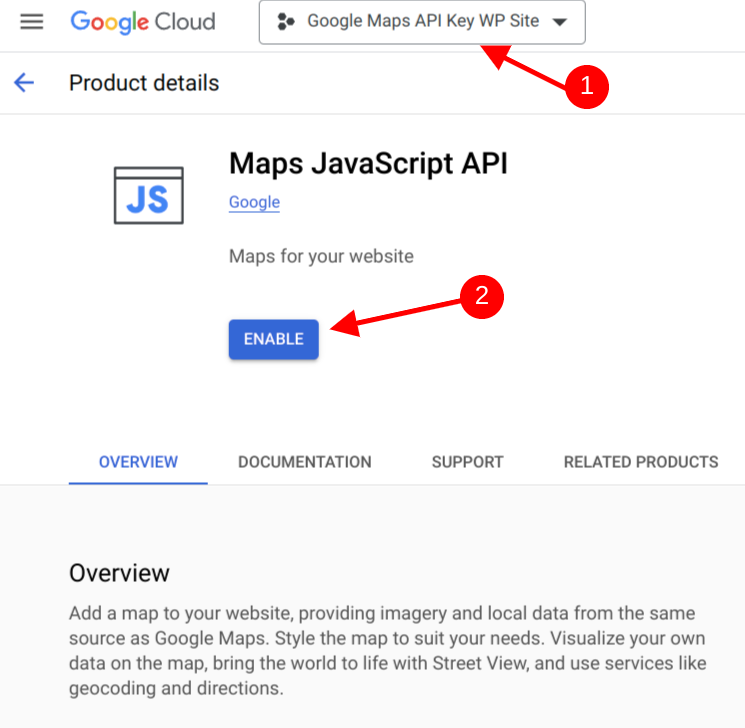
- Search for APIs: In the Library, search for “Maps JavaScript API” and click on it. Then click the “Enable” button.
- Repeat for Other APIs: Repeat for the other three APIs: Places API, Geocoding API, and Directions API. Enable each of them.
Step 4: Create a Google Maps API Key
Creating an API key of Google Maps is essential because it grants your application access to the Google Maps Platform services. This key acts as a unique identifier, allowing Google to track your usage and ensuring that you comply with usage limits and billing requirements.
-
- In the Cloud Console, click on the “Navigation Menu” > “APIs & Services” > “Credentials.” and Click the “Create Credentials” button
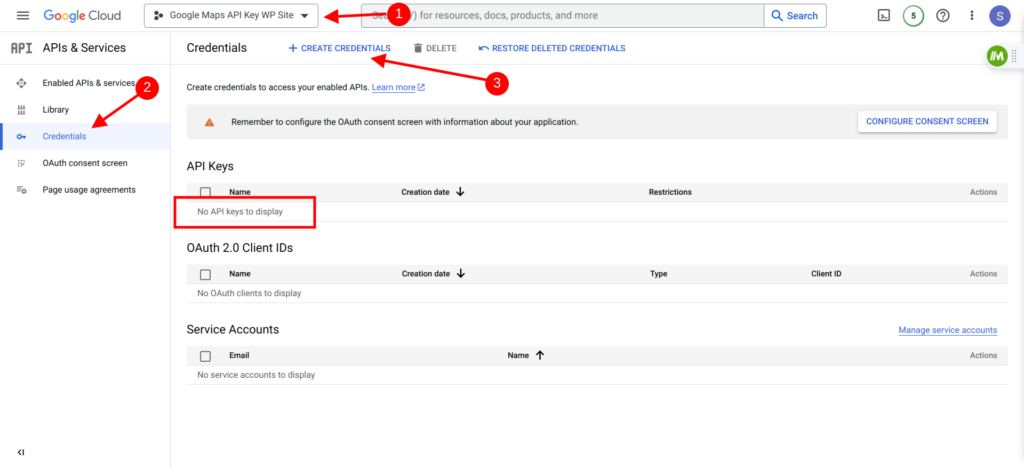
Fig 7: Google Cloud Credentials Dashboard - and select “API key.”

Fig 8: Google Cloud Credentials API Key - A new API key is generated and displayed. When generating an API key, it initially comes without restrictions. It is highly recommended to restrict the API key to prevent unauthorized usage and ensure security.
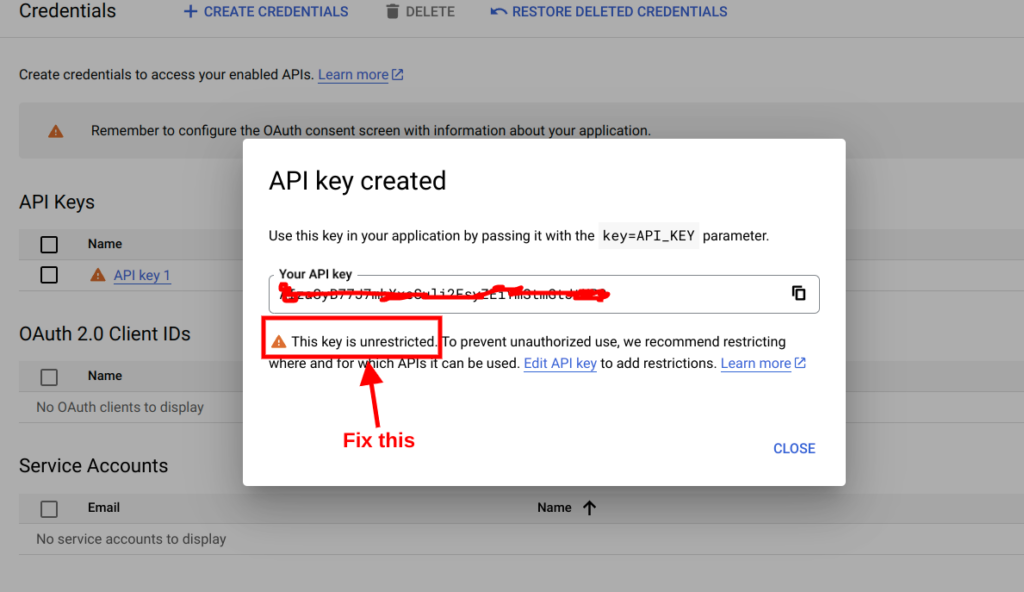
fig 9: Google Cloud Credentials API Key Unrestricted
- In the Cloud Console, click on the “Navigation Menu” > “APIs & Services” > “Credentials.” and Click the “Create Credentials” button
Step 5: Restrict the API Key of Google Maps (Recommended)
In this step, we’ll apply two types of restrictions: Key Restrictions and API Restrictions. In the Cloud Console, go to “APIs & Services” > “Credentials.”. Find your API key in the list and click on it to apply these restrictions.
Key Restrictions: These restrictions are applied directly to the API key itself. There are two types:
- Websites: You can specify the web domains (URLs) from which the API key is allowed to be used. This helps ensure that the API key is only used on authorized websites.
- IP Addresses: You can specify specific IP addresses or IP ranges that are allowed to use the API key. This adds an extra layer of security by limiting access to known IP addresses.
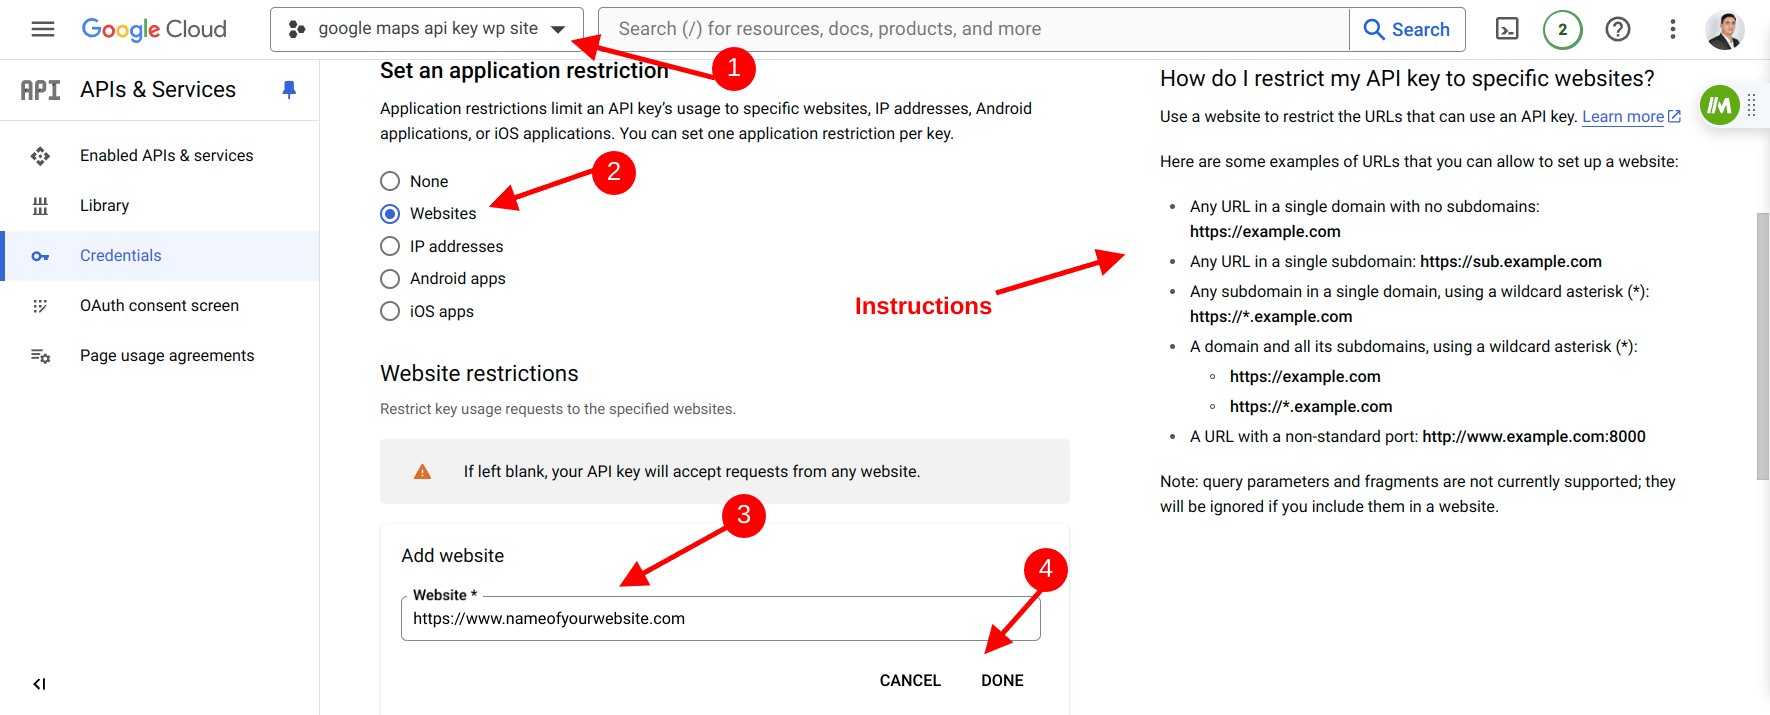
Fig 10: Google Maps API Key Restrictions
Correctly adding the website URL is crucial for the maps to display properly. Here are the proper URL formats with clear examples to ensure the setup is accurate:
- Single Domain URL:
- Example: https://example.com – Non-www URL with SSL.
- Example: https://www.example.com – WWW URL with SSL.
- Example: http://www.example.com – WWW URL without SSL.
- Example: http://example.com – Non-www URL without SSL.
- Single Subdomain URL:
- Example: https://sub.example.com
- Example: http://sub.example.com
- All Subdomains in a Single Domain using a Wildcard:
- Example: https://*.example.com
- Example: http://*.example.com
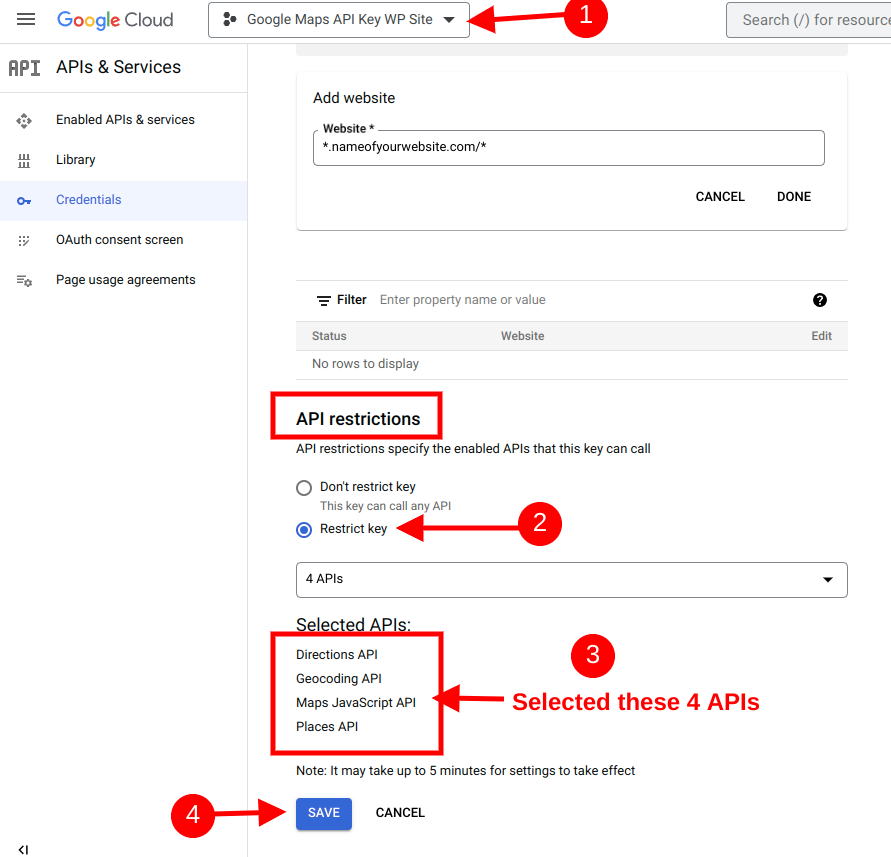
API Restrictions: These restrictions control which APIs can be accessed using the API key. You can choose which Google APIs the key can be used for. This helps to prevent unauthorized usage of APIs that your application doesn’t require.
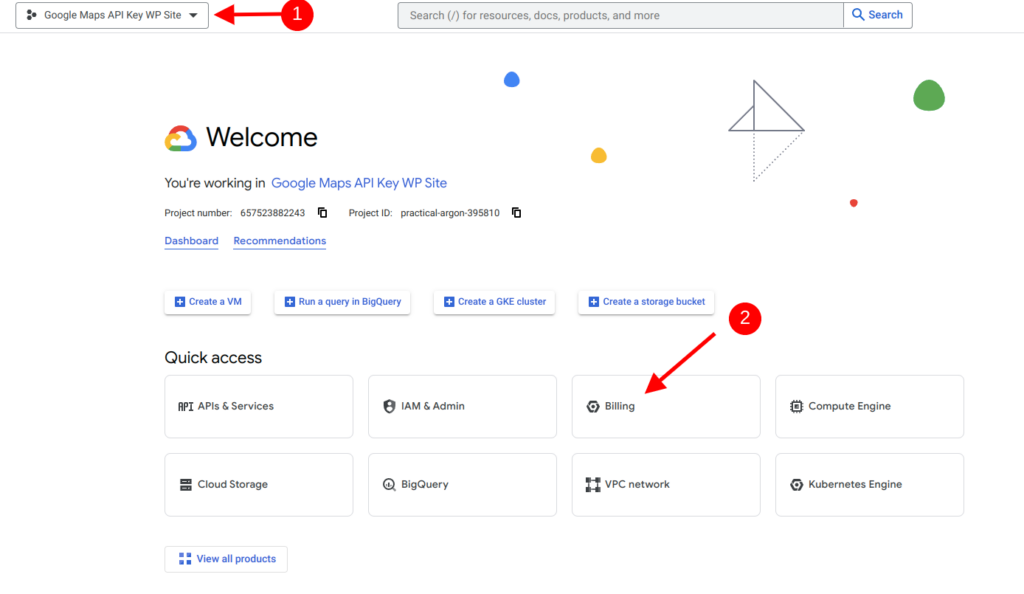
Step 6: Linking a Billing Account to Your Google Maps API Key
Linking a billing account to your Google Maps API key is a crucial step to ensure the continued functionality of your maps and location-based services. Without an active billing account, your API key may be limited or restricted, affecting the availability of map data and essential features on your website or application.
Step 1: Go to the Project Dashboard:
- Start by accessing your Google Cloud Platform Console.
- Select the project where you’ve generated the Google Maps API Key.
- Within the project dashboard, locate and click on the “Billing” link. This link takes you to the billing settings for the selected project.
Step 2: Check for Existing Billing Account:
Upon accessing the billing settings, you may encounter a notification indicating that no billing account is currently associated with the project. This is a common message, especially if this is your first time setting up billing for this particular project.
- To link a billing account, click on the “Link a billing account” button. This action initiates the process of connecting a billing account to your project.
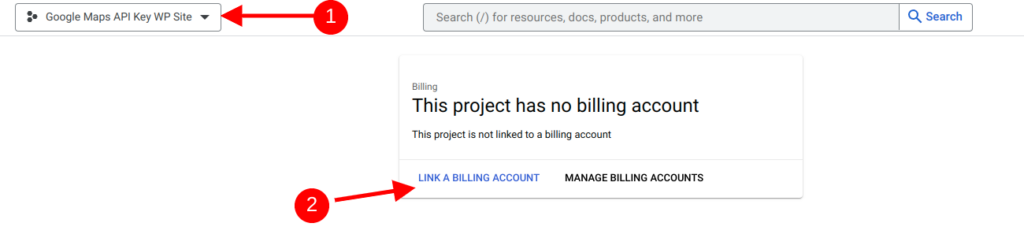
Fig 13: Google Cloud Billing LInk - You’ll now be presented with a list of available billing accounts. Choose a billing account that is associated with the “Google Maps Platform.” This ensures that the account will cover the usage of the Google Maps services utilized by your project.
- Once you’ve selected the appropriate billing account, confirm your choice, and follow any on-screen prompts to finalize the linking process.
That’s it! You’ve successfully generated a Google Maps API key and you’re ready to leverage the power of Google Maps on your website, and you can start creating dynamic and interactive maps. If you encounter any issues or need further assistance, refer to the plugin documentation or reach out to WP Maps Pro support.
Related Tutorials:
- How to create a marker category
- How to create a location
- How to create a google map
- Installing WP Maps Pro
- How to Get a Google Maps API Key