15000+ live websites are using this google maps wordpress plugin.

Archives: Docs

In the WP MAPS PRO plugin, metabox is used to assign the post / page to a map by creating a location using google map enabled textbox. Our plugin’s native metabox is by default visible on post / page and custom post type screen. But you can hide our meta box from any screen in the back-end by two ways:

From Posts or Pages

Step 1 Go to Posts > Add New or Pages > Add New or any custom post type screen’s Add New screen in the dashboard.
Step 2 You need to use the screen options at the top of the posts/pages and uncheck WP MAPS PRO checkboxes from selected screens.

Then you’ll see that metabox is now hidden for the selected screens in the back-end.

From Plugin Setting

Step 1 Go to WP MAPS PRO > PLUGIN SETTINGS.
Step 2 Under Meta Box Settings section, uncheck the checkboxes of all those backend screens where you want to hide the metabox created by our plugin and is not relevant to that screen. Keep the meta box visible on only those screens for which you want to display their information on the on map. It can be post / custom post / pages.

How to hide metabox from post and pages

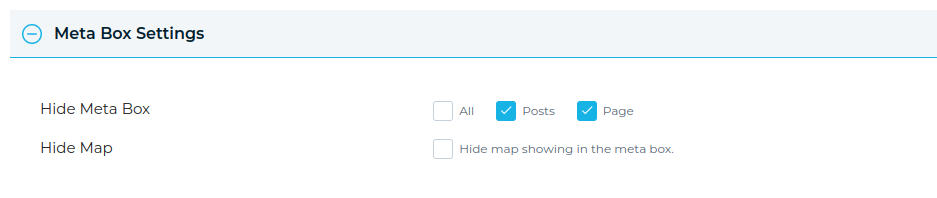
Step 3 Then click on Save Settings button. Now you’ll see that metabox is now hidden from the selected backend screens.

With the WP Maps Pro plugin, displaying your map on any post, page, or custom post type is quick and easy using a simple shortcode. When you create a map, a unique shortcode is automatically generated — all you have to do is paste it where you want the map to appear.


🗺️ Steps to Display Google Map on Frontend

Step 1: Go to the Manage Maps page in your WordPress admin. You’ll see a list of all your created maps.

Step 2: Find the map you want to embed and copy its shortcode.

Get shortcode from Manage Maps - WP Maps Pro

Step 3: Paste the copied shortcode into any post, page, or custom post type using the content editor.

Paste shortcode in editor

Step 4: Click Publish or Update the page. Now open your page on the frontend — your map will be visible!

Frontend Google Map Display


💡 Pro Tips

  • You can use the shortcode inside Gutenberg blocks, classic editor, or any page builder like Elementor or WPBakery.
  • Each map has a unique shortcode format like [put_wpgm id="123"].
  • Want to use maps in widgets or footers? Use shortcode-compatible widget areas.

Need help displaying your map? Submit a support ticket and we’ll assist you right away.

Want to highlight a specific area on your map? WP Maps Pro allows you to draw a circle radius around the map’s center — perfect for showing service zones, coverage areas, or zones of interest.


📍 Steps to Display a Circle Around Center Location

Step 1: Go to Add Map or Edit Map from your WordPress dashboard. Scroll down to the Map’s Center section.

Step 2: (Optional) Enter a custom Latitude and Longitude for your map’s center. If not specified, it will be auto-calculated from assigned locations.

Step 3: Enable the checkbox labeled Display Circle to draw a circular zone around the center location.

Enable Circle Radius Option - WP Maps Pro

Step 4: Click Save Map and view your map on the frontend. You will see a circle around the center location.

Map with Circle Radius Displayed - WP Maps Pro


💡 Use Cases

  • Show delivery or service coverage areas
  • Visualize a search or business radius
  • Highlight an event or venue area

Need assistance? Submit a support ticket — our team will help you configure it right!

InfoWindows are an important feature of WP MAPS PRO that allow you to add additional information such as text, images, and videos to any marker on your map. To display infowindow messages on individual locations, follow these simple steps:

Step 1 Go to Add Location or Manage Locations > Edit Location page.
Step 2 Select Display Infowindow from On Click. By default, it is selected.
Step 3 Enter the Message in Infowindow Message tab. You can use HTML elements as well.

How to Display infowindow message of each location Wpmapspro
Step 4 Click on Save Location and open the frontend map page. You’ll see the infowindow message on the marker click.

How to Display info window message of each location Wpmapspro

The content of each listing in the item can be altered using certain placeholders. Extra fields can be displayed by inserting {extra_field_name} into the text, and custom fields created for the list can be featured by adding {%custom-fields-name%}.

How to use listing placeholder

Step 1 Go to Add or Edit Map and scroll down to the Listing Settings section.

Then enable the Display Listing option.

Step 2 Then navigate to Listing Item Skin and add your extra field.

Step 3 Click on Save Map and open it in a browser. You’ll see extra fields added to the listing.

Are you looking for a way to print out your listing of the map? Look no further! This tutorial will walk you through the steps to easily print your full map listing. Just follow the simple instructions and you’ll be able to print out your listings in no time.

Step 1 Go to Add or Edit Map and scroll down to the Listing Settings section.

Step 2 Enable the Display Print Option inside the Display Listing tab.

Step 3 Save the map and open it in a browser.

You’ll see the print option on the map and click to print.

To change the title of the route tab, Please follow the below steps :

Step 1  Go to WP MAPS PRO > Manage Maps plugin menu. Edit the map on which route is already assigned. Scroll down to the Tabs Settings section.

Step 2  Enable the Display Route Tab checkbox inside the Display Tabs section.

Step 3  Now enter the updated Route Tab title in the Route Tab Title textbox in order to display it on the route tab on the map.

Change Route Title WP Maps Pro

Step 4 Scroll down a bit, click on the Save Map button and re-open the page in browser that contains the map.

You will see the route map title has been changed for your map.

Map Title Display WP Maps Pro

With the help of the WP MAPS PRO plugin, you can display not one, instead multiple routes on your map. To add a route tab in the map, please do with following steps:

Step 1 Go to WP MAPS PRO > Add MAP or WP MAPS PRO > MANAGE MAPS > Edit screen.

Step 2 Then scroll down to the Route Direction Settings section. Here you will see a list of all the routes that you have created with our plugin. You can choose and assign as may routes as you want on the current map.

Route Direction Wpmapspro

Step 4 Scroll down a bit, click on Save Map button & open the page that contains the map shortcode.

You’ll see the all the routes that you assigned are displaying on the map.

Display Route tab

You can display nearby places around a location on the WP MAPS PRO plugin using the nearby tab. You will be able to search for places nearby, like places to eat and drink, airports, and other places of interest in WP MAPS PRO.

Display Nearby locations

Step 1 Go to Manage Maps Page, now Add/Edit Map, and scroll down to the Tabs Settings section.

Step 2 Enable Display Tabs and Display Nearby Tab and select amenities according to your choice as below.

How to display Nearby locations using tabs settings Wpmapspro

Step 3 Then click on the Save Map and open your frontend map page.

You’ll see the following nearby tab on the map.

How to display Nearby locations using tabs settings Wpmapspro

Want to know how to hide the locations of categories in tab settings? Here’s what you need to do Follow the steps below for a seamless process:

Step 1 Start by heading over to the Manage Maps page. Scroll down until you reach the Tabs Settings section and you’ll be able to add or edit your map as needed. There, you can easily hide the location of any category in your Tab Settings.

Step 2 Go to the Display Tabs section and enable both the ‘Display Tabs’ option and the ‘Display Categories Tab’ option. After this is done, you will be able to easily hide the category locations from being visible.

Step 3 Then check the Hide Locations tab. (see screenshot)

How to hide locations of categories in tabs settings

Step 4 Open the frontend map page and select the “Save Map” option. Once you have saved the map.

Now You’ll see locations hidden from the categories tab.

How to hide locations of categories in tabs settings Wpmapspro

Install Plugin Now!

WP MAPS PRO helps you create dynamic, customizable maps using Google Maps or Leaflet — no coding required. Includes free updates, premium support, and a 30-day money-back guarantee.