Docs Archive - Page 6 of 12 - WP Maps Pro

15000+ live websites are using this google maps wordpress plugin.

Archives: Docs

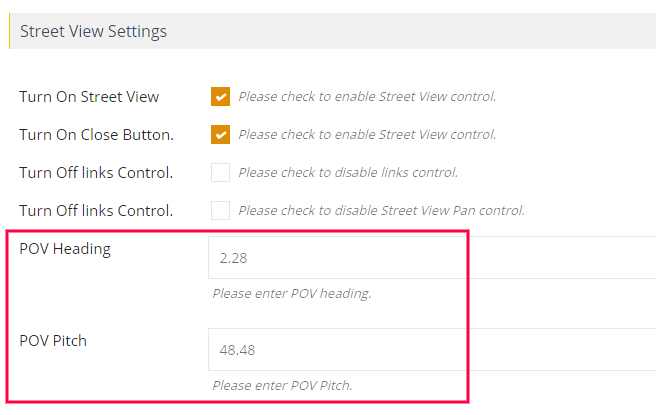
What are POV Heading and Pitch in Google Maps Street View? POV (Point of View) Heading and Pitch are parameters that control the direction and angle of the Street View image. Heading is the direction in which the camera is pointing while pitch represents the up/down angle at which the street view is taken. These parameters can be changed through Google Maps Street View Service tutorial to customize your Street View images.


Step 1 Go to Add or Edit Map page and scroll down to ‘Street View Settings’ section.

Step 2 Enable ‘Turn On Street View’ option.

Step 3 Then Enter the ‘POV Heading‘ and ‘POV Pitch‘.

Step 4 Click on Save Map and open it in browser.

What are POV heading and POV pitch in Street View Wpmapspro

Street View Settings Pov Image

The WP Google Maps plugin provides users the ability to assign permission levels for controlling locations, categories, routes, and maps. This makes it much easier to monitor who has access to which maps and gives administrators more control over the content on their site. By assigning permissions, users can ensure that only those with the appropriate privileges have access to sensitive information.

Step 1 To do this, simply go to the Manage Permissions tab in the WP Maps Pro, then select or deselect the checkboxes for each permission that requires adjustment.

How to assign permission to users in google map WP Maps pro

Step 2 When you are done making changes, click ‘Save Permissions‘ to save your changes.

You can limit the viewable area and zoom level of Google Maps using limit panning settings. WP MAPS PRO provides the easiest way to limit panning/dragging so the map stays within certain bounds using limit panning settings.

Step 1 Go to Add or Manage Maps > Edit Map and scroll down to the Limit Panning Settings section.

Step 2  Enable the Limit Panning option.

Step 3  Enter the latitude and longitude of South West and North West boundaries and select Zoom Level.

How to use limit panning settings

Step 4 Click Save Map and see the changes.

By making use of this functionality, you will be able to set the limitation of locations per page in the listing. Follow the below steps to do this:

Step 1 Go to the Manage Maps page, now Add/Edit Map, and scroll down to the Listing Settings section.

Step 2 Enable the Display Listing tab and enter the number of locations you want to display in the Locations Per Page tab.

Step 3 Click Save Map and open the frontend map page.

You’ll see 2 listings locations per page below the map and click to next display more locations.

The Full-Screen control allows displaying maps in full-screen view so the device screen will be covered by Google Maps. With the WP MAPS PRO plugin, You can easily turn on or off full-screen control on google maps.

Step 1 Go to Add or Manage Maps > Edit Map and scroll down to the Control Settings section.

Step 2 By default, Full Screen control is enabled. Tick the Turn Off Full Screen Control option to remove the full-screen control.

Full Screen Control Google Maps

Step 3 Click Save Map and see the changes.

InfoWindows are an important feature of WP MAPS PRO that allow you to add additional information such as text, images, and videos to any marker on your map. To display infowindow messages on individual locations, follow these simple steps:

Step 1 Go to Add Location or Manage Locations > Edit Location page.
Step 2 Select Display Infowindow from On Click. By default, it is selected.
Step 3 Enter the Message in Infowindow Message tab. You can use HTML elements as well.

How to Display infowindow message of each location Wpmapspro
Step 4 Click on Save Location and open the frontend map page. You’ll see the infowindow message on the marker click.

How to Display info window message of each location Wpmapspro

By using WP Google map plugin you can make a redirect link to a Draw Area so their browser can automatically point them to the new page of your choice.

Redirect link to Draw Area

Follow below steps to allow redirect link to a Draw Area:

Step 1 Go to Drawing page and select your map.

Step 2 After draw any shape , click on the shape and you’ll see options on the right side.

Step 3 Point to the ‘Shape onclick Event’ and Enter the link of your url in the box.

How to make a redirect link to a Draw Area Wpmapspro

Step 4 Click Save Drawing. Then click to draw area from front-end to see it in action.

Want to highlight a specific area on your map? WP Maps Pro allows you to draw a circle radius around the map’s center — perfect for showing service zones, coverage areas, or zones of interest.


📍 Steps to Display a Circle Around Center Location

Step 1: Go to Add Map or Edit Map from your WordPress dashboard. Scroll down to the Map’s Center section.

Step 2: (Optional) Enter a custom Latitude and Longitude for your map’s center. If not specified, it will be auto-calculated from assigned locations.

Step 3: Enable the checkbox labeled Display Circle to draw a circular zone around the center location.

Enable Circle Radius Option - WP Maps Pro

Step 4: Click Save Map and view your map on the frontend. You will see a circle around the center location.

Map with Circle Radius Displayed - WP Maps Pro


💡 Use Cases

  • Show delivery or service coverage areas
  • Visualize a search or business radius
  • Highlight an event or venue area

Need assistance? Submit a support ticket — our team will help you configure it right!

With the WP Maps Pro plugin, displaying your map on any post, page, or custom post type is quick and easy using a simple shortcode. When you create a map, a unique shortcode is automatically generated — all you have to do is paste it where you want the map to appear.


🗺️ Steps to Display Google Map on Frontend

Step 1: Go to the Manage Maps page in your WordPress admin. You’ll see a list of all your created maps.

Step 2: Find the map you want to embed and copy its shortcode.

Get shortcode from Manage Maps - WP Maps Pro

Step 3: Paste the copied shortcode into any post, page, or custom post type using the content editor.

Paste shortcode in editor

Step 4: Click Publish or Update the page. Now open your page on the frontend — your map will be visible!

Frontend Google Map Display


💡 Pro Tips

  • You can use the shortcode inside Gutenberg blocks, classic editor, or any page builder like Elementor or WPBakery.
  • Each map has a unique shortcode format like [put_wpgm id="123"].
  • Want to use maps in widgets or footers? Use shortcode-compatible widget areas.

Need help displaying your map? Submit a support ticket and we’ll assist you right away.

In the WP MAPS PRO plugin, metabox is used to assign the post / page to a map by creating a location using google map enabled textbox. Our plugin’s native metabox is by default visible on post / page and custom post type screen. But you can hide our meta box from any screen in the back-end by two ways:

From Posts or Pages

Step 1 Go to Posts > Add New or Pages > Add New or any custom post type screen’s Add New screen in the dashboard.
Step 2 You need to use the screen options at the top of the posts/pages and uncheck WP MAPS PRO checkboxes from selected screens.

Then you’ll see that metabox is now hidden for the selected screens in the back-end.

From Plugin Setting

Step 1 Go to WP MAPS PRO > PLUGIN SETTINGS.
Step 2 Under Meta Box Settings section, uncheck the checkboxes of all those backend screens where you want to hide the metabox created by our plugin and is not relevant to that screen. Keep the meta box visible on only those screens for which you want to display their information on the on map. It can be post / custom post / pages.

How to hide metabox from post and pages

Step 3 Then click on Save Settings button. Now you’ll see that metabox is now hidden from the selected backend screens.

Install Plugin Now!

WP MAPS PRO helps you create dynamic, customizable maps using Google Maps or Leaflet — no coding required. Includes free updates, premium support, and a 30-day money-back guarantee.